Monday, April 6, 2009

The art of lazy baking

Seems that life rewards the lazy.  Well, at least it did today. 

So, last night I was feeling daring.  I decided to risk it all.  I measured out 1/3 cup of starter, filled the rest of the cup with whole rye flour and dumped it in a bowl.  Then I added my 2 cups of my bread flour and the rest of the ingredients, so salt, honey and water all at once (1 tsp salt, 1 heaping tbsp honey, 1.5 or so cups water).  I added a bit more water, to make the dough softer than the normal “shaggy”, but I covered it and set it aside, overnight (so about 12 hours).  In the morning, it had risen beautifully.  I scooped the dough onto a floured surface, and decided to be even bolder.  After letting it rest for 15-20 minutes or so, I scooped it up (it was running away from me a bit), and I plopped it into my baking pot (which I first generously sprinkled with flour).  I put the pot, covered, in the oven (cold) and let it rise for 15-20 minutes.  Then I turned my oven to bake at 450, no preheating, just left the pot in there.  When it beeped to let me know it was at 450, I peeked under the cover, and it was rising so nicely.  I set the timer to 15 minutes.  At 15 minutes I took the top off. It had risen and split, looking fantastic. I could hardly contain myself. I let it bake another 15 minutes.  (Note: next time I’ll do it for 10 minutes, it was a bit too long and the crust was a bit dark, but I bet it depends on one’s oven or pot).  It looked like this:

It wasn’t perfect, it took on the shape of the pot, but it tastes awesome!  Seriously, it’s better than all earlier versions.  Moist, chewy, with a great crust.  Just heaven. 

I’m making no claim I’ve invented or even re-invented this recipe.  I just discovered it for myself, and it’s so satisfying to find a way to bake amazingly tasty bread at home without having to put a lot of effort into it.  Next I plan to try different flours and see what turns out.

Saturday, April 4, 2009

First things first, or let’s start with the starter

I’ve been meaning to translate and share the recipe I used for growing my starter.  I lifted it (with his gracious permission) from the author of the Polish Moja Piekarnia blog.  I asked him whether it would be OK if I translated and shared his recipes through my blog, and he said that he was all for it. 

So here it is, the “how to grow your own starter” recipe.  A word of warning, it’s not for the impatient or easily discouraged.  It takes trial and error (although I succeeded on my first attempt, and most people do), and time and time and time and did I mention time?  The key is not to give up and to let nature take its course, it will (most likely) be alright.  I personally used whole rye flour, but that’s because I did not have any medium rye flour on hand.  It is available in the United States, but as far as I have found, only if you order it online.  I haven’t seen it in stores.  Rye flour is way more popular in Eastern Europe than in the Unites States, where most bread is made out of wheat.  The reason why rye is a good flour for starter (and especially someone’s first ever starter) is that it is less refined and there’s more for the happy bacteria and yeast to digest.

For starters (ha!), if you don’t already own one, buy a kitchen scale.  The recipe is in milligrams, not cups and volume measures.  I did my first starter without one, and it was way more challenging than necessary.  You’ll want a flat one with a surface on which you can set a bowl and tare it to subtract its weight as you go.  I bought mine at Target, since they happened to have a sale, but even IKEA sells them.  A scale will run you $20-25 ($30-35 if you pick something fancy).

What is starter?  Well, if you want to be blunt about it, it’s really “spoiled” flour, or flour that has been mixed with water and left to ferment, meaning to be subjected to digestion by friendly bacteria and yeast from the environment.  Yes, that’s what is “sour” in sour dough.

You’ll need 3 ingredients:  flour, water, time… 5 days, to be specific.

You start by mixing 50-100 milligrams of rye flour with an equal amount (by weight) of water in a bowl and set it aside, covered, in a warm spot (77-86 degrees Fahrenheit is ideal to make bacteria and yeast happy).  If you have a server, put it near he server.  (Our computer room now smells like yeast, but we don’t mind.)  The other option is to set it near a vent (if you’re heating your house) or near your stove in the kitchen.   You repeat this process for 5 days, every 24 hours adding another 50-100 milligrams of flour and water.  It’s OK to stir the mixture once in a while to help the bacteria.  Your mixture may smell “funny” (as in, not pleasant), but that’s normal, and trust me, the bread will smell awesome.  As long as you don’t have mold, the starter will have its unique smell, depending on the balance of your homegrown beasties and yeasties.  The mixture should bubble and look something like this (since we’re using whole grain rye flour, it will be darker).


Young starter is likely to bubble much less, but don’t feel discouraged, over time it will get stronger.  Mine was seriously kicking behind by the third “generation” (3 loaves of bread later).   At the end you’ll end up with sufficient starter for more than one mixed flour bread. 

This is the basic recipe.  The rest is up to nature.  So don’t get discouraged if it takes longer or doesn’t go that well the first time.  If I succeeded despite the million kid related interruptions, delays, “oops” situations and such, then anyone can do this.

Friday, April 3, 2009

Attempt number two is a success (not unqualified, but a success for sure)

So, since a couple (OK, maybe three) people actually asked me how the bread turned out, I am updating.  Like I said in my earlier post, the results were more than encouraging, the salt SNAFU notwithstanding. 

I have refined the recipe some more this time, and tonight’s result (oh, and I made sure to add salt early in the process this time) is quite nice.  Still less of a rise, but I am sure it’s partially caused by the fact that I definitely let it rise too long (I was at the zoo with the kids all day instead of baking bread), so it had gotten a bit too moist and soggy (yeast ran out of stuff to “chew on”).  Still, it turned out really nice, which makes me feel good about the resilience of the recipe.

This time I used 1/3 cup of my whole rye starter, 2/3 cups whole rye flour, 1 teaspoon salt (original recipe calls for 1 1/4 teaspoons, but I don’t like salty bread, so it’s up to your palate), 2 cups bread flour and a total of 1.5 cups (approximate) of lukewarm water and 2 tablespoons (optional) of honey. 

The process I followed was to let the starter “wake up” at room temperature for about 45 minutes (it was in the refrigerator).  I added 2/3 cups of the rye flour and 1/2 cup lukewarm water to the starter along with my salt, mixed well, set aside (covered) in a warm spot (in this case on my microwave, close to the stove and my always hot water pot) and let it rise for 3 hours.  You want to see nice bubbling action, the starter will start looking like a sponge.  I will try to edit with a photo next time I do this.  Sorry, didn’t think about it this time.

I added my 1 cup bread flour along with 1/2 cup water and the honey at this stage, mixed well and again, let the mixture (covered) rise for 4 hours in a warm spot.  At that point I added the last cup of flour, another 1/2 cup of water (you want that shaggy dough, just a tad wetter).  I let that rise overnight, and should have baked then and there, but didn’t…

I will post a photo once my husband (who took the car that has the diaper bag that has the camera in it…) comes back.

ETA… And here it is:

So, it’s not pretty, but it tasted great.  Marc had some and commented on the complexity of the flavor, it’s the sour dough, giving it that “zing”, I said.

My plan is to keep playing with staging and hydration to see if I can get more oven spring and whether I can simplify the recipe further, adding all the bread flour at once.  I think my starter is strong enough to handle this.

Next I want to try to make some wheat starter and attempt a mixed bread like that.  More ambitious plans involve finding some flour ground more the flour for Polish bread.

Experiment update

Well, so the results are mixed, but it’s all my fault.  The bread rose, not as much as “regular” no-knead-bread, but nicely still.  It looks great and would taste great too except… I forgot to add salt!  Well, I have a great excuse – with one 3 3/4 year old and one 3/4 year old running (or crawling) around in the background as I was doing this, I got distracted.  So, I set that bread aside, and have started a new batch of dough with starter rising, this time paying more attention to time and amounts so I can record it.  I am sure I’ll keep tweaking.  If this loaf turns out, next I want to try adding all the flour in two steps instead of three to reduce the “fuss” and time spent on preparation.  I’ll post photos later on.  I promise.

Thursday, April 2, 2009

The great no-knead-bread-with-my-own-starter experiment

Wow, it’s been a while since I posted.  I haven’t stopped making bread at home.  Au contraire, I’ve been playing around with the no-knead recipe and I successfully baked several loaves with my own starter, perfecting my technique.  I am happy to report, that as far as the no-knead-bread goes, it doesn’t get any easier, because it’s so easy to begin with.  The basic change that seems to work regardless of flour type, is to substitute one cup of bread flour with one cup of whole grain flour of your choice (I’ve tried spelt, rye and whole wheat so far) and double the yeast from 1/4 to 1/2 teaspoon and add honey (if you want).  Those have come out great.

But I’ve grown more ambitious in my experiments, and are currently trying to use home-grown whole rye starter instead of commercial yeast in the no-knead-bread recipe.  So far, so good, for Experiment #1, but I have a feeling it will need refining.  I used 1/2 cup starter, 1/2 cup whole rye flour, 2 cups of bread flour, 1/2 teaspoon salt and 2 tablespoons of honey (I used Sage) and I didn’t pay much attention to how much water, since I was looking at the consistency of the dough.  I added the flour over time, not all at once, along with a bit of water each time.  It rose beautifully and is in the oven, we’ll see what comes out.  So far the biggest difference is that the dough was stickier (I needed more flour to keep it from sticking to the working surface, my hands, and the towel) and it does not have the “oven spring” of the no-knead-bread made with commercial yeast.  I have added 15 minutes to the clock with the cover on, and will check every 5-10 minutes.  I will post results (good and bad) later, along with photos, if it turns out presentable and palatable.  In any case, it’s the first time trying this, so I don’t expect complete success right away.

Wednesday, February 11, 2009

Dark rye bread turns out OK

I was hoping to post sooner, but life intervened.  My daughter had a bad asthma attack over the weekend that sent us into the Emergency Room on Sunday.  I think she plans these to always fall on weekends.  Seriously.  I still managed to bake bread, just not report on the results.

So, 4.0, which was two parts (two cups) whole rye and one part white bread flour turned out alright.  It was dense, but I didn’t get pumpernickel-like consistency, like I worried.  Next time I plan to use more water and a smidgen more yeast to get a bit more pop.  My dough was not wet enough, so it didn’t rise as much and the loaf was compact and chewy (but not too hard).  The yeast was working hard though, when I retrieved the dough at 18 hours, it was crackling like pop rocks.

The final result looked like this:

This is the bread that used the slightly less coarse, but still whole grain rye from Bellingham’s Fairhaven Organic Flour Mill.  In this loaf I also used aromatic Desert Mesquite Honey from Trader Joe’s.   My daughter enjoyed it very much (her standard breakfast consists of one slice of bread with honey smeared on it and one scrambled egg), and even my husband, who is not into “European tasting” (meaning, having a more complex flavor) breads liked it.

Sunday, February 8, 2009

Goodness in, goodness out, or the common sense of using quality ingredients

I promised in my earlier post to talk a little bit about ingredients.  Keep in mind that’s I’m a total newbie here, so this is probably the first of many discussions on this subject as I learn more about the process of baking bread.  But it’s common sense (at least to me) that the best ingredients will produce the best bread.  The main ingredient in bread, of course, is flour, and there’s a whole world of flour out there.  Flours are made of various grains, but the bread grains I have used to date are wheat, rye and spelt.  I will not get here into a detailed discussion of the differences between the grains, I’ll save that for a later post.  I’ll just say that wheat is the most common flour grain used in the world.  Rye is the second most common, and it’s most popular and grown in Central, Eastern and Northern Europe where “heavier” breads like pumpernickel are consumed.  Spelt is a hardier relative of wheat that is becoming more popular lately because of its sweeter, nuttier flavor, higher nutritional content and easier digestibility as compared to wheat.

Flours differ by how finely they are ground (from coarse to very fine) and also how refined they are (from whole grain, like whole wheat to just the core, starchy part of the grain, called endosperm, which produces the whitest flour).  In Europe flours are graded by how much ash is produced when a pre-set weight of flour is burned.  The more ash, the higher the grade (and the more  “wholesome” nutritionally speaking the flour is).

I will honestly say that I chanced upon the King Arthur brand of flours that I now use for my baking.

It was on sale.  I bought it.  And I was impressed with how much more my bread rose as compared to the run-of-the-mill all purpose flour I used before.  So for kicks I looked at their website.  It was an education.  Turns out that the King Arthur Flour company is the oldest flour mill in the United States.  They started milling flour when George Washington (yeah, that George) was elected to his first term as President.  Pretty cool, eh?  Also, and that matters for bread baking, King Arthur’s  Bread Flour has a higher protein content than the competition.  And the more protein (gluten), the more “pop” (meaning, your bread will rise more and will be chewier and fluffier).  Gluten is the culprit protein that gives so much trouble to people with Celiac Sprue.  Gluten can be bough separately and added to flour, but it takes a more experienced baker to know how much to add, so it will be a while before I go there myself.

The other flours I have used so far are rye flours.  I like Bob’s Red Mill Dark Rye Flour, it’s really heavy though, very unlike the fine rye that is used in Polish baking (as I found out by trying to use it to make light rye bread)

BRMrye

Bob’s Red Mill does make a fine, lighter rye flour though, and I’m hoping to try that one next.

The spelt flour that got into “Whoops” (3.0) was also by Bob’s Red Mill.

I also just finished baking a bread (let’s call that one 4.0) using a local whole rye flour, from Fairhaven Organic Flour Mill.  I like to buy local ingredients.  There’s something so appealing about knowing that what you eat was made by someone who is (almost) a neighbor.  On that note, the honey I used in my last two loaves was from Eagleman Farms.  I used mixed flower honey, but really look forward to baking with their outstanding buckwheat honey.  Yummy!

Unless you’re growing your own starter and growing wild yeast (doesn’t that sound romantic?), you’ll also want to buy a nice quality commercial yeast.  I haven’t looked into that much, but have been using the Red Star brand of dry yeast and it’s been working nicely for me.

OK, off to check on 4.0 which is looking awfully pumpernickel-like… I hope it’s tasty, at least.

Saturday, February 7, 2009

No-knead breads from version 1.0 through “Whoops”

I know you’re all dying to know how “Whoops” (also knows as 3.0) turned out. Well, it turned out awesome! One of those days I promise to use terms like “hearty crust” and “golden crumb” to describe the results of my baking. There’s all this jargon around bread baking, much like in the wine connoisseur community. Where a novice like me would say “Wow, this is nice wine” the seasoned wine aficionado would speak of “bouquet” and “notes” and “finish” and all that stuff. Well, the bread baking community is like that too, but my standard is really simple. Does it smell good? Does it look good? Does it make your mouth water? Is the crust crunchy without being too hard? Does it taste divine with plain butter (if you can have butter – I’m currently avoiding dairy because of my son’s allergies, pout) or jam or honey? If the answer is yes, I call it a winner.

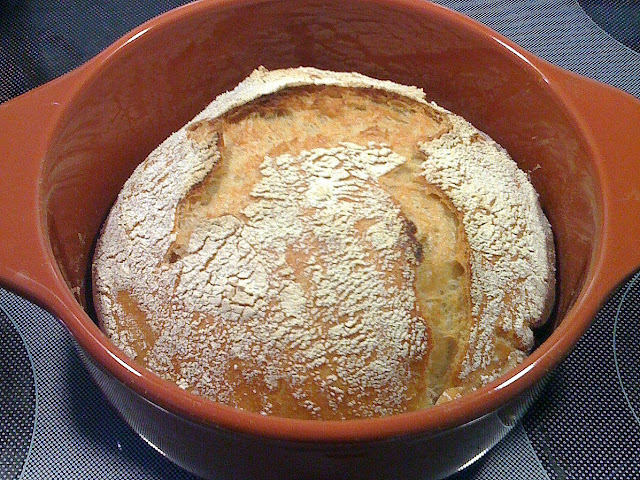
So, this is how the happy mistake (I used one cup white flour, one cup spelt flour and one cup dark rye) turned out:

So just for the sake of keeping track, here was my evolution of the no-knead bread.

The basic ingredients are as follows:

3 cups of all purpose or bread flour

1/4 teaspoon dry active yeast

1 1/4 teaspoon salt

1 5/8 (a little over 1 1/2) cups lukewarm water

You also need a covered clay or cast iron pot. I own a green version of this one made by IKEA (yes, Le Creuset is the best stuff money can buy, but I read here and there that it is not designed for as hot an oven as you need for baking bread, so if you’re going to risk it, better mess with a cheap Chinese knock-off).

Mix ingredients making “shaggy” looking dough (sticky, but not too wet) in a bowl. Cover and set in a warm place to rise overnight for 12-18 hours (longer is better). If your dough seems too wet, no worries, it will still turn out, but it will be a bit of a sticky mess to work with. Version 1.0 I used to much water. So, advice is add water gradually while you work the dough to avoid over-wetting.

The next night scoop out risen dough onto prepared (meaning, clean, I think) surface sprinkled generously with flour. Fold dough over on itself a couple of times, cover with plastic wrap (or a towel) and let “rest” (who knew that made the dough tired?) for 15 minutes.

Shape the dough into a ball, wrapping the “edges” under (so there’s a seam underneath) and place on generously pre-floured cotton dish towel (Target sells some for $1.00 a piece, I got a bunch). Cover with another dish towel (or wrap same one over on top, if it’s large enough) and go watch a movie or something for a couple of hours.

After about one hour and a half turn on your oven to 450 degrees and put your pot in there, cover and all. Half an hour later your oven and pot will be piping hot. Gingerly remove pot from oven, place on heat resistant surface (I have a glass top stove, so that’s where mine goes), remove cover (really carefully) and set it aside and dump your dough off the towel into the pot. The seam will now be on top. It may look messy and you’re likely to get flour on stuff, but that’s OK. Shake pot to distribute dough, cover, stick back in the oven for 30 minutes. After 30 minutes, reach in (carefully) and take cover off and bake 15-30 minutes longer uncovered, until the crust turns a yummy golden brown. (I discovered that with darker flours in my later experiments 15-20 minutes uncovered is long enough, so check at 15 minutes to gauge doneness.)

So here’s what my experimentation looked like since my first bread:

Version 1.0 (using all purpose flour and a clay pot, at my parents’ house in Virginia)

Version 1.1 (using King Arthur Unbleached Bread Flour and our cast iron pot, at home, it was fluffier because it rose more)

Version 2.0 (modified recipe, replacing one of the cups of flour with one cup of Bob’s Red Mill Organic Dark Rye Flour, adding one tablespoon of of honey and nearly doubling the yeast from 1/4 teaspoon to 3/8 teaspoon)

Version 2.1 (to which I added an extra tablespoon of honey, doubled the yeast to 1/2 teaspoon, reduced the salt to one teaspoon and reduced the water to right under 1 1/2 cups of water because 1.0 was too sticky and wet with the 1 5/8 the original recipe called for)

And on the inside it looked even better. The extra yeast helped it rise more, and I’m sure the honey fed it too. And it tasted so yummy! Move over $6/loaf fancy bread from Whole Foods!

Tonight I’m working on version 4.0, trying a new, lighter rye flour from a local mill (I’ll say more about ingredients in a separate post, but using quality ingredients obviously does matter).

If you try your hand at it, let me know. Happy baking!

Thursday, February 5, 2009

How I caught the bread baking bug

About a month ago I got bitten by the bread baking bug. I was motivated to try baking bread at home to avoid cross-contamination with peanuts, tree nuts, corn, soy and dairy, wholesome ingredients used by most commercial and artisan bakeries to which my 3.5 year old daughter is allergic to. By coincidence around that time my husband discovered and emailed me a version of the recipe for no-knead bread that has been making the rounds of the amateur gourmet circles of the blogosphere since it appeared in the New York Times a little over two years ago. It has been evolved since the initial version by the many cooks who tried it. The version of the recipe that landed in my Inbox came from the blog of Adam D. Roberts, a.k.a. The Amateur Gourmet and author of a book by the same name. For my first attempt I followed the recipe by the book (or should I say, by the blog... ha ha ha... ahem). I bragged about my success on Facebook, posting photos like the ones of no-knead bread 1.0, below (looks tasty, doesn't it?) and friends started asking me for the recipe, wanting to try it.
I decided that it may be a good idea to blog about my bread baking experiments. That way I can showcase my Iron Chef (not) skills, share my recipes with my friends and keep track of my recipes, all at the same time.
I decided to name the blog (quite appropriately) "Daily Bread" because for some reason the relevant line ("and give us this day our daily bread") from the Lord's Prayer in Polish, French and English kept popping into my head. I had this revelation that it had to be about this, the bread that we used to bake daily to feed our families (not according to Wikipedia though, they say it is supposed to be about something symbolic, but I like the simple explanation better). Now mind you, I am no longer a Christian (I think of myself as a Spiritual Freethinker), but I did learn the Lord's Prayer in each of those languages in my life. So "Daily Bread" it is.
After my encouraging early results with the no-knead bread, I became more adventurous and started to tweak the recipe by substituting ingredients and changing proportions. I added whole grain rye flour and honey for a more "wholesome" loaf (versions 2.0 and 2.1) and right now version 3.0, a.k.a. "Whoops", is rising in our computer room (it seems that it has the right temperature to make yeast and bread growing bacteria happy). Whoops is called that because I meant to repeat 2.1, since it was so wildly successful with my tasters (my husband, my daughter and, well, yours truly), but I accidentally added spelt flour in addition to the rye. Whoops! We'll see what turns out tomorrow.
At the same time that I was playing with no-knead bread, I made the decision to try to grow my own starter, old school like. I found a fantastic Polish language blog by an amateur baker called Moja Piekarnia (My Bakery). The author describes step by step what to do to successfully grow one's own starter. I tried it and I was successful. The starter looked and smelled funny (think baby poop), but the bread (dark rye) turned out OK. My first attempt was brick-like, but tasted fine, like a "razowy" bread from Poland. I figured out that I used the wrong kind of rye flour (too coarse) and made pumpernickel-like bread. I am just learning about the huge differences in flours here, in the United States, there, in Poland, and everywhere. It seems like every country has different flours and the system of grading them varies from place to place. Still, the bread was moist and tasty and the second attempt with the starter that had grown stronger was better yet. Right now "Freddy The Starter" is sitting in a small jar in my refrigerator, waiting for me to get the right flour so we may try to make sour dough bread again.